Showing posts with label Nail Dare. Show all posts

September 18, 2012

Nail Dare: Neons

I've been sporting neon-colored nail polishes lately and I guess I'm loving it! Thanks to my podiatrist for stocking a lot of color choices! Let's make this simple, having neon colors on your nails will encourage you to be versatile in dressing up! For me, it's because of this color that I was able to challenge myself in dressing up with patterns and bold colors. So why not take a try? Anyway, there's no harm and trust me, it will give you a lot of pros most especially when pairing it with a good dress up. So here are two of the neon colors I wore the past few weeks.

Apple Green!

Neon blue!

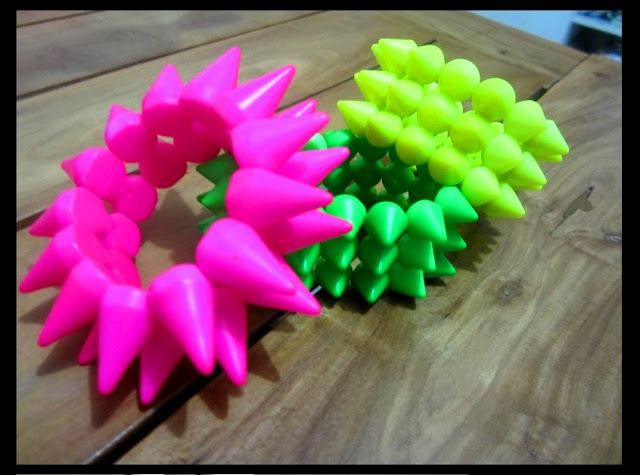
And it's good to pair these with these neon spikes like these!

So there, Neon is so in! :)

June 9, 2012

Nude, Pastel and Earth

I've been sporting and buying stuffs with nude and pastel colors lately. Yes, I guess I just ended my summer. Did I even have one? Well, because of the reviews and my very "strict" parents (No, they're not the traditional strict. Haha. Feel ko lang tawagin silang strict. This is because they did not allow me to have the Vacation I wanted! Huhu) my summer plans were dissolved to bits and pieces. *sigh* I'm just keeping myself positive right now cause I guess it's for the better. Chos! Well, of course it is cause it's far way less than a month to go before the judgement day (Gulp!) So going back, I was just talking about the nude and pastel colors which to sum is called "Earth Color". (Is my grammar even correct about that? Haha.) Anyway, yes, I've been having these stuffs in my closet lately and they just look so relaxing to the eyes...

Nude Nails
I choose this nail color most(75%) of the time because I could wear it anywhere. Anywhere, it is appropriate. But yes of course, the other ones still do, all colors are fun (as you can see in my Nail Dare posts) but this is just so simple that it becomes elegant in the eyes. Let's just say, it's a playsafe color. Haha. And a lot of my girl friends wear this color and all of them give the same sentiments about it. Well boo-yah! Nude nails, a-huh! :)

Nude and Pastel Clothes and Shoes
Without being so conscious about it, I've been buying clothes which were of earth colors too. I went to Forever 21 North Edsa yesterday and I went home with these clothes and I just realized the colors when I got them fitted in my room already. Okay, I am not a Fashionista and I don't know why this is even linked to the Fashion tag. Haha. But I guess the nude color is just so "in" these days. And just so you know, I tend to be so impulsive when it comes to shopping. I always get scolded because of that. A big percent of my allowance goes to my clothes but to be honest, I don't really regret having done so. And mom just kept on nagging about that then praises my clothes after. Bipolar. But I love her for that! :))

But it is just so funny at times when she herself buy us things as if the world is ending already. The flat shoes were bought by her. She bought Coleene, Nikki and I three pairs each last week. And I'll be using them for everyday purpose cause flats are comfy shoes and I love them, as proven by Shoe Confessions: I Love Flats. The Wedge Shoes was the one I used during Lady Gaga's Concert. The outlet lady picked it for me and I guess she has a good taste. And thanks to Jo for picking it as her faorite among my shoes! Hihi.

And just days ago, I just bought this Chronicle necklace from Ate Marnee's Online Accessory Shop. I guess it's a good accent to any nude clothing. :)

Nude is sexy, I guess. Cause it will emphasize any skin color and it is so pleasing to the eyes. It is so classy and could be fun at the same time. But most of all, pair it to any pastel color and you can build up a style with the fierce Earthly look. :)

May 26, 2012

Nail Dare: Americana

It's been a while since my last post on Nail Dare. But since I promised on my last post about giving a tutorial on the Americana Nail, I'll be doing it right now. I'm teaching you how to do it. But before anything else, I would just like to thank you for all your good feedbacks regarding Nail Dare. My posts on Nail Dare, as I kept track on it, are some of the most viewed posts in my blog. So I guess, this will make us invade the fashion on nails. And I heard some of you telling me you tried some designs already and it "fattened" my heart. Haha! So there, let's get started with this.


I had this design on my nails two times already. Once was when I can't remember and the second was during Gaga's concert. I just felt like wearing it! Maybe because the flag of America will suit her concert since she has a song entitle Americano. Well, just a thought. Haha. But anyway, here's how.

1. Apply a white coating on your nails. Double coat it if it is too thin.
2. Using a nail art brush, paint on red stripes from the base of your nails to the tip. Apply them around 1-2mm away from each other. draw the last two stripes half way to give way for the blue part of the flag.
3. Apply a blue corner just above the red stripes you drew half way. By the way, before applying the red stripes and the blue corner, make sure that your white coating is dry.
4. Dry the blue corner too, a thin paint will dry up more easy.
5. Using a nail art brush, draw dots on the blue corner just like the stars on the American Flag. If you could draw stars literally, it would be better.
6. Coat the whole art with colorless nail polish after drying them up to add a shimmer.

White coating and dots- Caronia White Satin
Red stripes - Sassy Red
Blue corner - Caronia Aqua Frost

And there, you have the Americana nail! Go and try it. You could also have the Philippine flag as well. Just add a yellow nail polish and you'll know what to do! :)

April 25, 2012

Nail Dare: Booby Traps


Ok, just to clear things out, I entitled this post as "Booby Traps" because I'll be showing you my friends' (a.k.a. Booby Traps, what the hell, that's our name! Who cares? Haha!) nail arts.

Yesterday and the other day, I painted their nails with different designs, some of them were their ideas, then I was the one who used the brush and the nail paints to draw them. Chloe had the strawberry, Jocs wore the bumble bee, Jen had the tiger and Ai decided to have a cheetah print. So I'll be giving the details of each. And let's start with Chloe's strawberry.


A. Strawberry


  1. Use Red as your base color. I used Caronia's Simply Red with Chloe's design. Double coat if it is too thin.
  2. Coat the base with a colorless nail polish. You can omit this if you are sure that the base is thoroughly dried or if you think it would be too thick to still add this step.
  3. Start doodling the details. I used Caronia's On The Go nail polish for the leaves of the strawberry. Draw short strokes from the base of the nail going towards halfway the center. Make sure to make them look like leaves. Don't play safe, make it a little bit messy to make it more realistic (not too messy, of course.)
  4. Play around the strawberry seeds using a nail art brush. Use the black color. Distribute where to put the seeds evenly.
  5. Coat the whole design set. You're done!
B. Bumble Bee


  1. Use Matte Black as your base color. Double coat if it is too thin.
  2. Coat the base with a colorless nail polish. You can omit this if you are sure that the base is thoroughly dried or if you think it would be too thick to still add this step.
  3. Start with the line details. Use a Yellow nail polish with a nail art brush. Draw the lines one space from the other to make the body of the bee. Leave the tip of your nails with the black base.
  4. For the eyes of the bee, point 2 circles on each nail tip using a white nail polish. It doesn't have to be drawn with a nail art brush. Just paint with a good amount of nail polish on the regular brush and you'll have your desired result.
  5. Dry or coat the tip of your nails with the white dots using a colorless nail polish.
  6. Apply smaller dots on each white dot using a black color. You can add antennas to the bumble bee by drawing spiral lines using a black nail art polish above the eyes as desired.
  7. Coat the whole design with Colorless nail polish.
C. Tiger


  1. Use Orange as your base color. I used Caress' Neon Orange for this. Double coat if it is too thin.
  2. Coat the base with a colorless nail polish. You can omit this if you are sure that the base is thoroughly dried or if you think it would be too thick to still add this step.
  3. To draw the tiger lines, start from the sides that are touching the skin of your nails. Draw strokes on alternating sides. Draw long and short strokes on each segment.
  4. Coat the whole design with Colorless nail polish.
*You can use different base colors for this design. Neon Violet, Gold, White Satin and Red would be really great.

D. Red Cheetah


  1. Use Red as your base color. I used Caronia's Simple Red with Chloe's design. Double coat if it is too thin.
  2. Coat the base with a colorless nail polish. You can omit this if you are sure that the base is thoroughly dried or if you think it would be too thick to still add this step.
  3. To draw the cheetah prints, mark your nails with messy strokes of dots and map-like figures. Imagine a real cheetah with a print that's unpredictable and indefinite. I used Caronia's Beige for these strokes. You can use any shade of brown for this. Shades of gray will also do.
  4. Using the Black nail art polish, draw lines surrounding the strokes you've drawn on the precious step. Do not totally surround the strokes, leave some parts unlined. Add some other dots and strokes using the black color. Do not play safe on this part. Be the wild cheetah!
  5. Coat the whole design with Colorless nail polish.
*This design would also look good on other base colors most especially with the Touch of Tan. I had no Tan nail polish yesterday so I decided to just apply red as the base. Lucky, it still looked good on Aileen's nails.


You can have these designs on your nails too. Just follow the steps or create your own! You'll love doing it, promise. :)

Watch Out: The Americana Nail Polish soon!

For questions, comments or whatever, feel free to ask/tell me. Just comment or message me personally. I would be really glad to answer your queries as soon as I can. I would be really glad to receive some other good design ideas from you guys. :)

April 24, 2012

Nail Dare: Mr. New Yorker


So I changed my nail design again. I went way too excited about a lot of designs so I got fidgety on changing and changing and changing my Tiger nail paint. I ended up designing my nails with a tux miniature, together with the bow tie and the buttons. :)

A lot of people, including my parents, siblings and classmates, had been asking me if doing such was hard. To be honest, it's not really hard to do this just that when it's already the turn of your nails on the right hand, everything just go way too messed up. (But I'm getting better at this. PRACTICE. Gulp!) It's time consuming, but with a little ounce of effort and practice, you will soon get used to it. Like me! ;)

I've also decided to share my "talent" on this by including a tutorial (Not a video, pure words. Sorry, I'm really camera shy. Haha.) 

And I'm starting with my Mr. New Yorker nail. Here it goes.
1. Apply your first coating on your nail with a white nail polish. With Mr. NY'er, I used Caronia's white satin. Double coat with the same color if the first coating looks a little thin for your nails.
2. Coat with a colorless polish. This will separate the first coating with the details that you will be applying. You can omit this step if you think it's better not to or if you want a thinner application on your nails.
3. To make the bow tie, you will need a nail art brush. 

I used the nail polish with the brand Sassy. Apply a/n X using a black polish across the topmost portion of your nail. Paint all over the gaps between the X's.
4. The buttons are just dots done using the same brush that I used with the tie. Apply the dots forming a line at the center. I've put 3 to 4 buttons only on each nail because adding more would look very exaggerated already.
5. Apply the last coat, the colorless nail polish. This will maintain the shimmer of your well groomed nails. Dry it for at least an hour to make sure all the layers are well done.

There, it's that easy. You guys can do it too. You can think of other designs, just follow the principles on when to use the thin and the regular brush and when to apply the colorless polish. By the way, I made designs on my friends' tips too, I'll try to post them as soon as I can. Kath had the bumble bee, Chloe had the strawberry, Aileen had the red animal print and Jen had the Tiger, it looked good on them and I was just so happy they liked it. So, until the next nail bites. :) 


April 23, 2012

Nail Dare: Tiger


Because girls wanna have fun, a lot of us in our class started to pamper our nails as the review classes started. Grabbed the opportunity since we have no more duty days. I  decided to have this Tiger Nails. Made it by myself, good thing, I finished both hands fair, at least. :)